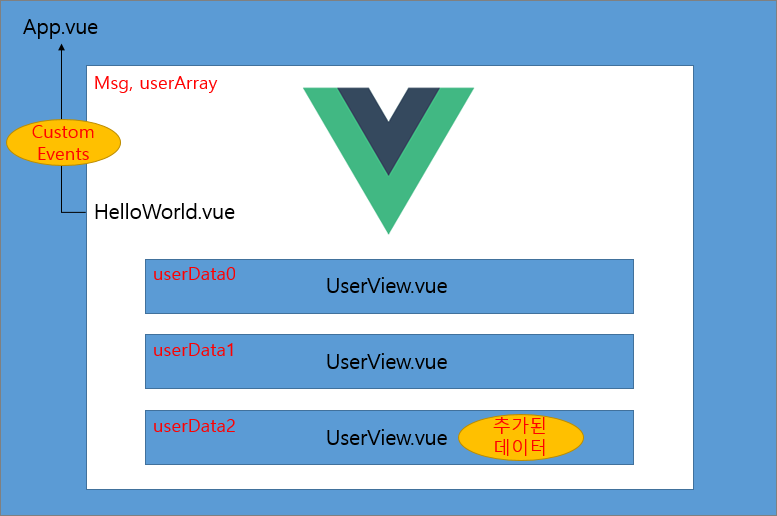
Vue.js에서 Custom Events를 이용한 상위 컴포넌트의 데이터 변경

하위 컴포넌트에서 상위 컴포넌트로 어떠한 데이터를 전송하거나 상위 컴포넌트의 데이터를 수정하고 싶을 때 Custom Events를 사용할 수 있다. 하위 컴포넌트는 상위 컴포넌트의 데이터에는 직접 접근하여 수정할 수 없으며 상위 컴포넌트로 요청을 하는 것이다. 이때 하위 컴포넌트에서는 상위 컴포넌트가 알 수 있도록 $emit('작명') 구문으로 전송하고 상위 컴포넌트에서는 메세지를 수신할 수 있도록 @작명="스크립트" 코드를 이용한다.
- 샘플 프로젝트 생성
> vue create custom-events-test
샘플 프로젝트를 생성하면 App.vue는 상위(부모) 컴포넌트로서 하위(자식) 컴포넌트인 HelloWorld를 쓰고 있다. 샘플 프로젝트의 소스를 보면 App.vue로부터 HelloWorld.vue로 이미 이름이 msg인 String 값을 Props를 이용하여 전송하고 있는 것을 확인할 수 있다.
- Props를 이용한 하위 컴포넌트로 데이터 전송
지난 시간에 props를 이용하여 최상위 컴포넌트인 App.vue는 그 하위 컴포넌트인 HelloWorld.vue에 msg와 userArray 데이터를 props를 이용하여 전송, HelloWorld.vue 컴포넌트는 msg 데이터를 출력하고 userArray 개수만큼 그 하위 컴포넌트인 UserView.vue 컴포넌트를 생성하고 userData정보를 전송, userView.vue 컴포넌트는 userData 정보를 받아 출력하는 부분을 예제에 이어서 하니 아래 링크 또한 참고하자.
Vue.js에서 Props를 이용한 하위 컴포넌트에게 데이터 전송
Vue.js에서 Props를 이용한 하위 컴포넌트에게 데이터 전송 props는 properties 의 줄임말로 상위 컴포넌트가 하위 컴포넌트에게 데이터를 전달해줘야 할 때 props를 사용한다. 단방향 데이터 흐름을 가
jiurinie.tistory.com
- 데이터 전송
Custom Events를 이용하여 HelloWorld.vue에서 Input 박스를 통해 정보를 받아 userData를 전송하여 상위 컴포넌트인 App.vue의 userArray에 데이터 추가를 요청한다.
- Custom Events를 이용하여 상위 컴포넌트에게 요청할 데이터
{
  userId: 3,
  id: 1,
  title: "qui ullam ratione quibusdam voluptatem quia omnis.",
  completed: true,
  class : user-info,
  color : pink
}
- UserView.vue
HelloWorld.vue 컴포넌트로부터 받아온 userData 정보를 출력한다.
<template>
  <div>
    <div>id : {{ userData.id }}</div>
    <div>userId : {{ userData.userId }}</div>
    <div>title : {{ userData.title }}</div>
    <div>complete : {{ userData.completed }}</div>
    <div :class="userData.class">class : {{ userData.class }}</div>
    <div :style="{ color: userData.color }">color1 : {{ userData.color }}</div>
    <div :style="`color:${userData.color}`">color2 : {{ userData.color }}</div>
    <p></p>
  </div>
</template>

<script>
export default {
  name: "UserView",
  props: {
    userData: Object,
  },
};
</script>

<style></style>- HelloWrold.vue
사용자 정보 Input 박스를 이용하여 상위 컴포넌트인 App.vue에 custom Events를 이용하여 데이터 추가를 요청한다. userArray에 사용자 정보가 추가된다. '사용자 정보 추가' 버튼을 누르면 sendEvent() 함수가 호출되며 this.$emit 구문으로 상위 컴포넌트에 데이터 전송을 한다. 데이터 전송이 필요 없다면 두번째 인자는 작성하지 않고 this.$emit("add")로 사용한다. 이때 Custom Envets 이름은 'add' 로 전송이 된다.
<template>
  <div>
    <img alt="Vue logo" src=".././assets/logo.png" />
    <div class="hello">
      <h1>{{ msg }}</h1>
      <UserView :userData="userArray[i]" v-for="(a, i) in userArray" :key="i" />
      <div class="user-box">
        <h3>사용자 정보 추가</h3>
        userId :
        <input
          :value="userId"
          @input="(event) => (userId = event.target.value)"
        />
        <p></p>
        id :
        <input
          :value="id"
          @input="(event) => (id = event.target.value)"
        />
        <p></p>
        title :
        <input
          :value="title"
          @input="(event) => (title = event.target.value)"
          size="50"
        />
        <p></p>
        completed :
        <input type="checkbox" id="checkbox" v-model="completed" />
        <label for="checkbox">{{ completed }}</label>
        <p></p>
        class :
        <input
          :value="cls"
          @input="(event) => (cls = event.target.value)"
        />
        <p></p>
        color :
        <input
          :value="color"
          @input="(event) => (color = event.target.value)"
        />
        <p></p>
        <button @click="sendEvent">사용자 정보 추가</button>
      </div>
    </div>
  </div>
</template>

<script>
import UserView from "./UserView.vue";

export default {
  name: "HelloWorld",
  data() {
    return {
      userId: "",
      id: "",
      title: "",
      completed: false,
      class: "",
      color: "",
    };
  },
  props: {
    msg: String,
    userArray: Array,
  },
  components: {
    UserView,
  },
  methods: {
    sendEvent() {
      this.$emit("add", {
        userId: this.userId,
        id: this.id,
        title: this.title,
        completed: this.completed,
        cls: this.class,
        color: this.color,
      });
    },
  },
};
</script>
<style>
.user-box {
  margin-top: 100px;
}
</style>- App.vue
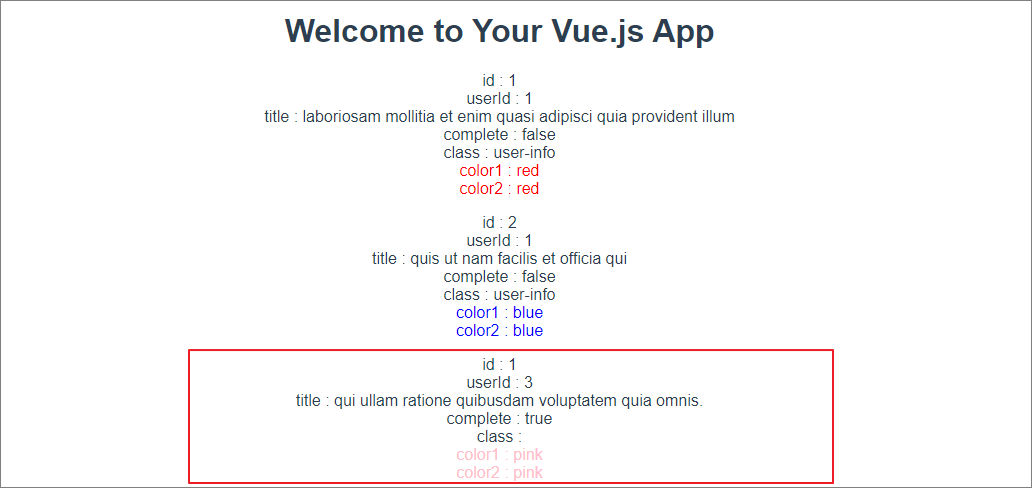
HelloWorld.vue에서 전송받은 데이터는 HelloWorld 컴포넌트 사용 구문에서 @이름="호출 메소드 명" 으로 선언할 수 있다. add() 메소드에서는 받은 데이터를 출력하고 userArray에 push 해준다. userArray는 정보는 자동 반영되어 HelloWorld.vue 와 userView.vue 컴포넌트를 거쳐 추가된 사용자 정보를 출력한다.
<template>
<div>
<HelloWorld
msg="Welcome to Your Vue.js App"
:userArray="userArray"
@add="add"
/>
</div>
</template>
<script>
import HelloWorld from "./components/HelloWorld.vue";
export default {
name: "App",
data() {
return {
userArray: [
{
userId: 1,
id: 1,
title:
"laboriosam mollitia et enim quasi adipisci quia provident illum",
completed: false,
class: 'user-info',
color: 'red'
},
{
userId: 1,
id: 2,
title: "quis ut nam facilis et officia qui",
completed: false,
class: 'user-info',
color: 'blue'
},
],
};
},
components: {
HelloWorld,
},
methods: {
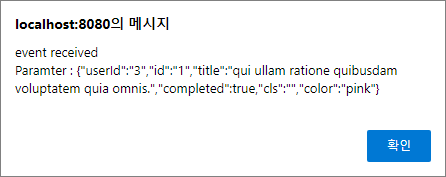
add(params) {
alert("event received \nParamter : " + JSON.stringify(params));
this.userArray.push({
userId: params.userId,
id: params.id,
title: params.title,
completed: params.completed,
class: params.class,
color: params.color,
});
},
},
};
</script>
<style>
#app {
font-family: Avenir, Helvetica, Arial, sans-serif;
-webkit-font-smoothing: antialiased;
-moz-osx-font-smoothing: grayscale;
text-align: center;
color: #2c3e50;
margin-top: 60px;
}
</style>
- Custom Events를 이용한 데이터 출력 화면
'Programming > Vue.js' 카테고리의 다른 글
| Vue.js에서 mitt을 이용한 멀리있는 컴포넌트간 데이터 전송 (1) | 2022.12.23 |
|---|---|
| Vue.js에서 Props 대신 Slot! 하위 컴포넌트에게 데이터 전송 (0) | 2022.12.20 |
| Vue.js에서 Props를 이용한 하위 컴포넌트에게 데이터 전송 (0) | 2022.12.09 |
| Vue.js에서 Axios를 이용한 비동기 통신 (1) | 2022.12.06 |
| Vue.js에 Bootstrap 설치 및 사용하기 (0) | 2022.11.25 |


댓글